I have a desire to build a tiny house. This is the first step - creating one place for all of the related information.
Tuesday, June 24, 2014
Wednesday, June 4, 2014
The Art Of Pallet Wood Flooring
Borrowed from...
We have blogged Just The Plane Facts where we told you how all the pallet wood was prepared, to be used as flooring.
We have blogged Prep Time where we shared with you how we installed the sub floor.
We have blogged Pioneering where we explained some of the difficulties we have had and solutions we found, while installing the pallet wood flooring.
What we haven’t blogged is the finished product!
Are You Ready?
It took us several weeks to put all the pallet wood down.
This was not an easy task!
We didn’t want a pattern on the floor but we also didn’t want the same type of pallet wood together in the same spots.
We had four widths of planks. (2 inch, 3 inch, 4 inch and 5 inch)
There are so many different types of pallet wood, it was almost like putting a puzzle together without any idea of what it is suppose to look like.
We started by sorting light wood and dark wood.
We then top nailed the wood down with our new dinosaur, alternating light and dark.
Doing our best to mix the textures of the wood.
We ended up setting a patten by placing a row of 2″, followed by four rows of 3″, then adding a row of 4″, following again with four rows of 3″, nailing the 5″ planks and placing the last four rows of 3″ planks before the pattern started over.
It worked out perfectly!
Each set of the pattern was 4 feet wide.
This is where Flower Boy and I realized we are not young!
Being on our hands and knees for hours at a time is not an easy thing when you are in your 40′s!
We got to the half way point in the room and ran out of prepared pallet wood!
Another lesson learned…
There is a difference between board feet and square feet.
This was not an issue for us, as there was other construction going on in the house at this time.
The stopping point allowed the other contractors less worry of damaging the wood with the amount of traffic needed to go across the floor in order to complete their projects.
It was also a time when Flower Boy was gone for training, so Drewman and I had plenty of time to prepare the remainder of the wood.
Funny how things have a way of working themselves out!
No need for panic!
Just look for the positive and move forward!
When Flower Boy returned, the contractors were finished with their projects, Drewman and I had the rest of the planks ready
AND
we finished nailing the pallet wood down.
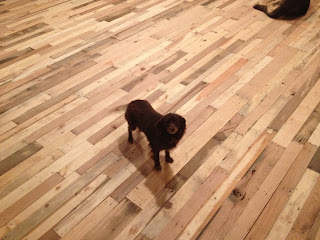
Princess Sheba likes the new floor!
The floor set for a few weeks while the remainder of the construction was complete in the house.
We didn’t cover it with paper to protect it.
We wanted the Dust, Dirt and Grime to distress the wood.
After the entire house was dust free, Flower Boy and I started the sealing process of the flooring.
We started with a liberal coat of mineral spirits.
The mineral spirits cleans the pallet wood and soaks into the grain of the wood, to open it up so the sealer will penetrate and adhere.
We applied the mineral spirits with a low nap wool applicator and brushed it on around the edges of the room.
When the mineral spirits were completely soaked into the wood, we then started applying the finish.
The finish was applied in the same manner as the mineral spirits.
We are using a product used on basketball gym floors.
The product is for high traffic and resists scuff and marks.
Perfect for our ranch style life!
The grain of the pallet wood popped when the floor finish was applied!
With each coat applied, the floor became richer and richer in appearance.
A total of four coats, of the finish, have been applied.
We each have our favorite plank!
Flower Boy’s is the center board in this photo.
Drewman’s is the center of this one.
My favorite is all the planks with the knot holes.
The builder walked in the door yesterday and gasped when he saw the floor.
We have had so many nay sayers and negative reactions when we were researching ways to lay this floor.
We had one contractor give a bid of $12,000 to put the floor down.
We never once thought this floor wouldn’t be beautiful or even thought it couldn’t be done.
We are so proud of our stellar job and all that our hard work and efforts have produced!
The Art Of Pallet Wood Flooring!
MASTERED!!!!!!
Posted by Rancher Girl at 10:23 AM
Original article at: http://abuildingweshallgo.blogspot.com/2013/05/the-art-of-pallet-wood-flooring.html
Subscribe to:
Posts (Atom)


