Wednesday, December 24, 2014

What should the roof pitch be? 12:3 or maybe 12:4?


WHAT IS THE “BEST” ROOF FOR MIAMI OR SOUTH FLORIDA?


People often ask me what is the best type of roof for Miami or South Florida. Sometimes they ask what kind of roof I have on my own house north of Coral Gables. I always tell them, the best roofs are roofs that last, and in South Florida, roofs that will last depend on the structure of the building they sit on top of. Miami roofing contractors work on a broad variety of South Florida roofs because Miami is a community with a variety of styles of architecture _ each one requires a different kind of roof.

Very few roofing contractors in Miami and South Florida have the experience to deal with all the various conditions local roofs may face. Anthony Wilson Roofing, in business for decades, understands your unique roof needs. And we want you to understand it too. Below is our best explanation of the needs and potential pitfalls for a South Florida homeowner or business owner who needs a new roof.

Best roofs versus roofs that last

I suppose the public perception is that there might be some universally accepted best or premium roof system that is better than all others for our conditions in South Florida.  The answer is there really isn’t.

The primary reason for this is that roofs have to be installed on Miami buildings and houses that each present different conditions and challenges for both installation and weathering and serviceability.

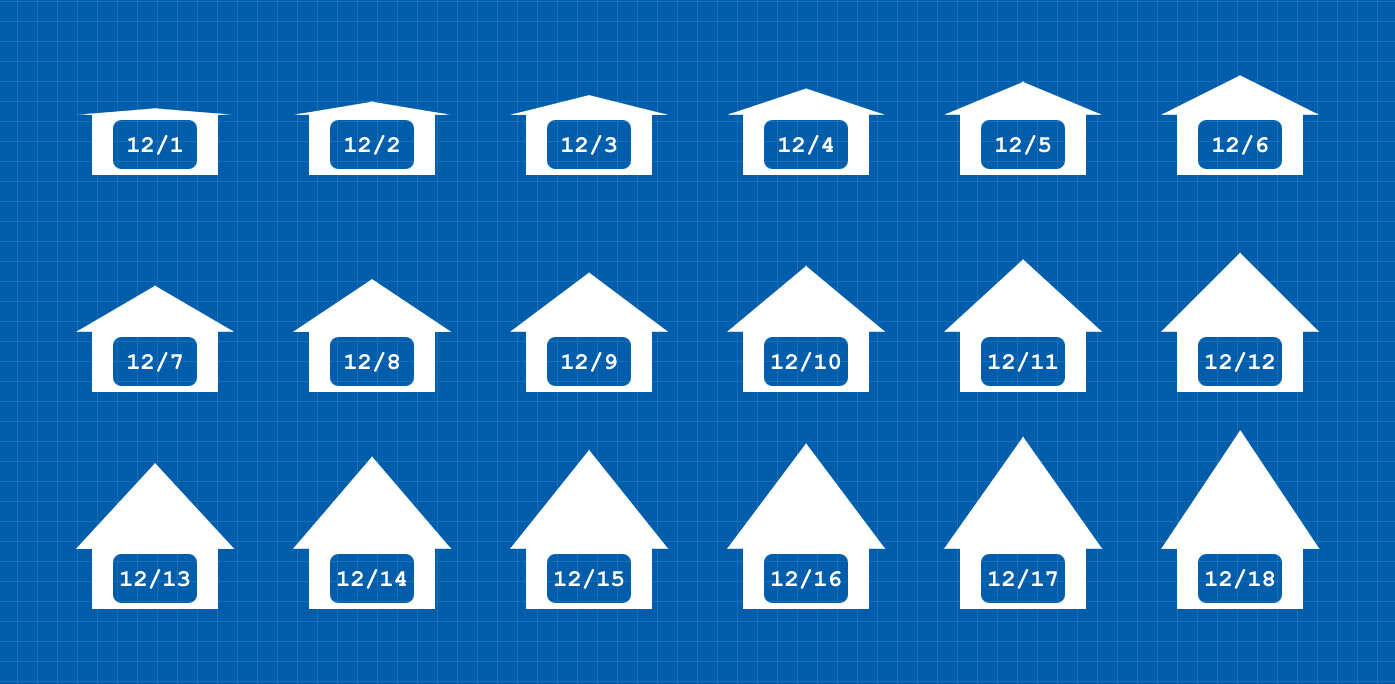
The National Roofing Contractors Association as well as the South Florida Building Code and the Florida code create the first and most obvious delineation based on the roof’s slope. (Some refer to this as pitch. It is expressed as “rise over run.” This means that if you measure 12 inches of roof surface from the bottom edge – going up hill – and the elevation increases 2 inches in that 12 inch distance – the slope is expressed as 2 in 12 – usually written 2:12).

Low slope is defined as roofs with less than 2:12 slope – for which our code in South Florida requires a “continuous roofing system.”  Continuous simply means this is a fully sealed membrane of some type _ like a fiberglass or modified bitumen hot-mopped system or a rubber or TPO membrane.

For slopes above 2:12 or 3:12, most “discontinuous” roofing systems may be installed in South Florida. These systems are also called “water-shedding” systems because they function as individual pieces that shed the water to each subsequent piece downhill.  Most residential sloped roofs use systems that fall within this category. Tile, shingles of all types, metal and slate are all examples of this type of roof.

So, the real answer to the question of what is the “best” roof  in South Florida? is it’s the one that is most able to deal with the particular slope, environmental, and traffic issues that it has to deal with within its life cycle.

So what should a South Florida home or business owner look for in a roof?

Roofs that last in South Florida can be hard to come by, but they’re easy to build. It’s all a question of a basic understanding of roof engineering – and not cutting corners.

In general, discontinuous roofs perform better at steeper slopes than their code or practical minimum. We recommend a minimum slope for discontinuous roofs of at least 4:12 – this is a much safer minimum for Miami and South Florida roofs.

Continuous roofing systems perform well from “dead flat” up to and above 2:12 slopes.  These systems may also be installed at steeper slopes where the typical limiting factor is whether the system provides the appropriate fire rating.

All roofs in Miami can suffer from vegetative debris that falls on or accumulates on their surfaces, as this impedes water flow and drainage.  Asphalt, shingle and metal roofs are also easily damaged by things like sweeping palm fronds here in South Florida, which damage the surface of these roofs. Tile roofs suffer such assaults better.

Many tile roofs are installed here in South Florida as a type of hybrid roof – they utilize a sealed membrane underlayment that is then covered with the discontinuous tile system. This is often the best solution for a homeowner or business owner who wants a roof that will survive South Florida weather. At Anthony Wilson Roofing, we offer roofing systems designed to take advantage of both technologies, with upgrades that can be hard to find in the industry, like synthetic paper barriers that are longer-lasting and more weather impervious than the traditional tar-paper often installed under tile. We also offer upgrades to take advantage of the fact that if you’re installing a new roof to also install extra insulation. We find this option can be a true cost-saver for our clients and helps them mitigate the draftiness of homes that were built before any of us were concerned about energy efficiency. Many of the homes we’ve worked on were originally built without air conditioning and we’ve found this extra layer of insulation in the roof can dramatically lower homeowner cooling costs.

And please be advised – for the most part, the South Florida Building Code is primarily concerned with wind uplift issues.  We at Anthony Wilson Roofing are also concerned about wind issues and we work hard to ensure our roofs meet every code for wind, but we advise our customers that there are other issues they should be aware of.

Flashing and other details matter

Many types and methods of flashing that have been considered outmoded and antiquated are still allowed, because the code is still a “minimum” standard. When you compare roofing proposals, each type of flashing, for every junction and penetration should be individually specified, as to both material quality, as well as exactly where in the construction of the roof system (a metal flange for instance) the flashing component will end up.

Roofs that last are hard to define, but easy to identify.

In summation – the real answer is to avoid labeling. Each building in South Florida is different and has different needs for a solid roof. And roofing details, like the flashing and junction construction can be far more important than the use of “best” multi-ply or “best” roof membrane material. At Anthony Wilson Roofing, we take all of these important details into account, working to ensure that our roofs can stand up to South Florida conditions for years to come.

- Anthony

Monday, December 15, 2014

Wednesday, November 5, 2014

Purchased two lots.

This time I bought two 25 x 100 foot lots. The address is 667 Maytown Road, Osteen Florida.


I requested that the seller give me lots 5 and 6 instead. We will see which one comes on the deed.


Friday, October 17, 2014

Now I Have Some Land! NOT!!! - YES!!! - Some.

Update: First the good news. I have the deed for the Osteen property as recorded with the county. Now the bad news. It looks like the Orange City land was indeed a scam. I was not taken for too much money, $650. I can accept the loss and move on enjoying the Osteen lots. :-)

Update: I looks like I have been taken by a scam. I sent payment, the check cleared but I have not heard from the "seller". Looks like I got took.  :-(

Update: A month later I heard from the seller. He tells me that he has sent me the deed transfer papers. I now have hope that I have purchased this land


------------------------------------------------------------------------------------------------
I bought some land north of Orange City. It's a little less than an hour's drive to my daughter's place in Orlando. The price was unbelievably cheep - $650 including closing costs. I am holding my breath while waiting for the deed.

The lot is located 500 feet to the east of 2862 Hamilton Ave., Orange City, FL 32763


Friday, September 26, 2014

Recycle Materials Housing

Low-income houses from recycled goods


Video 1 of 3


Video 2 of 3


Video 3 of 3

Tuesday, August 26, 2014

Now here is a crazy idea - hull made into houseboat.

This 20 foot long "project boat" is offered free on craigslist.


I'm thinking that it could be converted into a tiny houseboat like this...

Joe Fernon is quite at home aboard Lilypad, the 20-foot shantyboat he built.

By starting with an existing boat you can save a "hull" of a lot of work.


Sunday, August 17, 2014

Shelter made from two water tanks

This has been borrowed from...

http://stereotank.com/Taku-Tanku

Taku-Tanku – Bicycle Towable Floating Tiny House Design


TAKU-TANKU
Saitama, JAPAN, 2014 - Competition entry
In collaboration with Takahiro Fukuda

TAKU-TANKU is a travelling little house. Carried by one or two persons or by a bicycle, by a car or potentially even by a boat, TAKU-TANKU is made out of water tanks and can travel through many landscapes to serve as companion and shelter but also as a sculpture that celebrates the vital role of water in our lives.

TAKU-TANKU is an eco-friendly project that can be easily assembled, built with off-the-shelf and re-purposed materials. The structure is composed by two 3,000 liter water tanks connected by a ring of wood that frames the entrance.


Thursday, August 14, 2014

The Moron Brothers


I encourage all to watch this little documentary. Tiny houseboat built by brothers. This could be the life.


:-)


Wednesday, June 4, 2014

The Art Of Pallet Wood Flooring

Borrowed from...

We have blogged 
Pallets Repurposed where we explained how we took the pallets apart.

We have blogged Just The Plane Facts where we told you how all the pallet wood was prepared, to be used as flooring.

We have blogged Prep Time where we shared with you how we installed the sub floor.
We have blogged Pioneering where we explained some of the difficulties we have had and solutions we found, while installing the pallet wood flooring.
What we haven’t blogged is the finished product!
Are You Ready?
It took us several weeks to put all the pallet wood down.
This was not an easy task!
We didn’t want a pattern on the floor but we also didn’t want the same type of pallet wood together in the same spots.
We had four widths of planks. (2 inch, 3 inch, 4 inch and 5 inch)
There are so many different types of pallet wood, it was almost like putting a puzzle together without any idea of what it is suppose to look like.
We started by sorting light wood and dark wood.
We then top nailed the wood down with our new dinosaur, alternating light and dark.
Doing our best to mix the textures of the wood.
We ended up setting a patten by placing a row of 2″, followed by four rows of 3″, then adding a row of 4″, following again with four rows of 3″, nailing the 5″ planks and placing the last four rows of 3″ planks before the pattern started over.
It worked out perfectly!
Each set of the pattern was 4 feet wide.
This is where Flower Boy and I realized we are not young!
Being on our hands and knees for hours at a time is not an easy thing when you are in your 40′s!
We got to the half way point in the room and ran out of prepared pallet wood!
Another lesson learned…
There is a difference between board feet and square feet.
This was not an issue for us, as there was other construction going on in the house at this time.
The stopping point allowed the other contractors less worry of damaging the wood with the amount of traffic needed to go across the floor in order to complete their projects.
It was also a time when Flower Boy was gone for training, so Drewman and I had plenty of time to prepare the remainder of the wood.
Funny how things have a way of working themselves out!
No need for panic!
Just look for the positive and move forward!
When Flower Boy returned, the contractors were finished with their projects, Drewman and I had the rest of the planks ready
AND
we finished nailing the pallet wood down.
Princess Sheba likes the new floor!
The floor set for a few weeks while the remainder of the construction was complete in the house.
We didn’t cover it with paper to protect it.
We wanted the Dust, Dirt and Grime to distress the wood.
After the entire house was dust free, Flower Boy and I started the sealing process of the flooring.
We started with a liberal coat of mineral spirits.
The mineral spirits cleans the pallet wood and soaks into the grain of the wood, to open it up so the sealer will penetrate and adhere.
We applied the mineral spirits with a low nap wool applicator and brushed it on around the edges of the room.
When the mineral spirits were completely soaked into the wood, we then started applying the finish.
The finish was applied in the same manner as the mineral spirits.
We are using a product used on basketball gym floors.
The product is for high traffic and resists scuff and marks.
Perfect for our ranch style life!
The grain of the pallet wood popped when the floor finish was applied!
With each coat applied, the floor became richer and richer in appearance.
A total of four coats, of the finish, have been applied.
We each have our favorite plank!
Flower Boy’s is the center board in this photo.
Drewman’s is the center of this one.
My favorite is all the planks with the knot holes.
The builder walked in the door yesterday and gasped when he saw the floor.
We have had so many nay sayers and negative reactions when we were researching ways to lay this floor.
We had one contractor give a bid of $12,000 to put the floor down.
We never once thought this floor wouldn’t be beautiful or even thought it couldn’t be done.
We are so proud of our stellar job and all that our hard work and efforts have produced!
The Art Of Pallet Wood Flooring!
MASTERED!!!!!!
Posted by at 
Original article at: http://abuildingweshallgo.blogspot.com/2013/05/the-art-of-pallet-wood-flooring.html

Thursday, April 10, 2014

Harbor Freight 1720LB Trailer & Modifications


This super duty utility trailer is designed for carrying heavier loads. Add your own planking to create a heavy duty hauler!
  • Trailer bed tilts all the way to the ground for easy loading and unloading
  • Heavy duty steel frame with baked enamel finish
  • Frame has built-in slots for stake siding (stake sides not included)
  • Three leaf spring suspension
  • Includes: coupler, safety chain, wiring harness, trailer light kit, and license plate holder
  • Overweight Item subject to $89.95 additional Freight Charge
  • An additional lift-gate charge may apply.

Comments about Haul-Master 1720 Lb. Capacity Super Duty Utility Trailer, 48" x 96":
I bought this trailer to haul Harley's around. I have two, a 1988 FLHTC and a 1993 XLH. I also ride with a bunch of folks with Harleys. I had considered buying this trailer a couple of years ago but, kept putting it off. Last Thursday one of the guys broke down ten minutes from my house and it became a real hassle. I decided that I needed to go ahead and get a trailer.

I bought this one as it gets good reviews and has more than enough weight carrying capacity. I put it together, sans the plywood top in about three hours of work. Here's what I learned: As other people have suggested, lay out the parts first. This speeds the process way up. There are 20 and 25 length bolts. They are very close so, compare in advance. I would note that I assembled this trailer by myself. It's completely possible, in fact, easy to do so with a bit of heavy lifting.

Mine came in two boxes. The long skinny one is very heavy. You'll need help or a hand truck. I have a hand truck. Also, I used a air wratchet to put the trailer together. If you dont have air tools this will take twice as long to assemble.

After you have laid out the frame pieces they go together quickly with an air wrench. If you're using an air wrench, start all of the bolts and nuts in a section (2 4x4 sections), top and bottom first, then tighten them down. It will go very fast. This trailer is not a folding trailer. Once I got the frame assembled I flipped it over and installed the springs and axle.

People say that the bearings need to be repacked. The bearings are packed with grease but, the hub assemblies are dry as a bone. The grease in the bearings looks like the standard HF axle grease. I use this on the chassis on my motorhome and it works fine. All I did was add a significant amount of high quality grease into the nub assembly so that when the grease in the bearings heats up and runs out that grease will be there to flow into the bearings. In the literal sense I didn't "re-pack" the bearings as I suspect very few do.

The grease seal on the inside of the hub will probably be damaged if you try to remove it so, I left the inside bearing in place and just added some good quality grease. The wheels spin beautifully and I don't see any real potential for problems in the near future.

The tires are 2 ply tires that require 80 PSI. From the box they had 20 PSI. Make sure you service them. Some folks say they plan to get better tires. I may in the future but, for now I plan to keep the HF tires. I plan to two my FLHTC to Sturgis in 2014. All I'm going to do before that trip is check the bearings and get 4 ply tires. It's 1650 miles one way. One warning, the lug nuts were barely on so, don't tow this thing without checking those.

Some folks have welded the frame together. I have no plans to do this. It doesn't seem to need that.
I read that people struggled with the fenders. The instructions kind of indicated that you install the fenders while the unit is upside down or before you flip it to install the axle and hubs/wheels. What I did was install the wheels, set it rightside up, put jack stands under the axle, remove the wheels from the hubs and installed the fenders. It didn't take much time (using air tools).

As far as the lights go, they seem like decent quality. As others have mentioned, the ground setup stinks. If you were bolting to unpainted metal it would probably work fine. But, the paint is thick and I intend to leave it that way. Rather, just pull an extra wire to all the lights for a good ground.
Lastly, the 1720LB capacity trailer uses a 2 inch hitch ball.

Gypsy Wagon/Tiny House Tour in Germany (Recycled/Dumpster Dived)

Monday, February 17, 2014

Berkeley's backyard tiny house adds income & affordable housing

Renting land for a tiny house

This is when to buck conventional wisdom.  There are a lot of great books on being mortgage free.  “Buy the best land possible with the least amount of money” is some advice often given.  If you search the phrase “When NOT to buy land” or something similar, your effort would result fruitless.  So I am writing the first article on the web EVER about when NOT to buy land. *disclaimer….I often exaggerate.
When we decided to get our tiny house, the first questions asked was “Where ya gonna put it”?”.  Good question.  I thought I wanted land.  My own land.  You are supposed to own land.  So off we went to look.  Here I what I found:
In our area, where I WANT TO LIVE, land is going for $15,000 to $30,000 an acre!  Thank you Wal-Mart.  20 years ago my parents bought land for $500 an acre, 10 acres total.  That land just sold for $15,000 an acre.
Our county requires a minimum of three acres per house if you want to build in the country.
debras tiny house video tour   Tiny House Living: Renting Land Versus Owning Land
To build in the country, often there is no access to water, and you must dig a well.  My parents water well cost them $10,000.  Here is a good article I read on calculating the cost of  digging a water well:  Digging a Well, What You Need To Know
Sometimes the land does not perk.  If you are fortunate, and it does, you have to put in the septic tank.  This will cost between $3,000 to $7,000.
So here is the breakdown:
  • $40,000 minimum for land
  • $4,500 for septic tank
  • $6,500 for water
  • Electric hookup, this will vary depending on how far in you want your house.  Up to $75.00 linear foot.
  • Property taxes.  We paid $960 a year three years ago on a 2,000 square foot home.
  • Factor into all this our ages.  My husband is 60, I am 45.  I do not need land, I need savings.  My son needs savings for his education.
These obstacles are not insurmountable, it is just that I do not want to exert that much effort when my real goal is to TRAVEL!
Now, this is what it ‘costs’ us to rent:
  • $125.00 a month.  In the summer we rent for free, since the land we rent has a good garden plot, we are able to grow our own vegetables, saving at least that amount per month.  So, in reality, we only pay about $80.00 per month, (possibly less) for space to park our home.
  • The next reason we do not own land is freedom.  For this reason alone many people rent.  You can pick up and go, not have to deal with selling your land.  If I leave after three years (which I may.  My ageing mother-in-law may need help, we have freedom to go), I only have ‘invested’ $3,000.  If I sell my house and land (supposing I purchased), I will likely have to pay that much in closing costs and fees.
  • Property taxes – $0.00 Just because that is the way it is.  The savings on property tax alone would pay a significant part of our rent.
  • Low overhead for our business.  I split the rent between our business and our personal expenses.   How many business rent a space for $40.00 a month?


Thursday, February 13, 2014

Tiny home on wheels: an illegally small home

California DIY, shipping container tiny home and a cargo trailer bedroom

2013 BEST SMALL HOME - Fine Homebuilding HOUSES Awards

Tiny Texas Houses Presents: The August 2013 House Spotlights "The Vesper...

Itty Bitty House, take a tour of this non-toxic tiny house on wheels

What Not To Do On A Tiny House Build (the good and bad of a small home o...

23 year old woman builds a Tiny Tumbleweed House/Cabin in California

This guy has it all figured out.

Amazing Off-Grid Tiny House


Welcome to Bob's Tiny House Pipe Dream

I am not a rich man and want to retire on what Social Security will be paying. That means living on the cheap. The purpose of this blog is to keep all of the information in one easy to find place. Come visit often. Your help with the project is welcome.

:-)
Bob

Funky Creative and Dangerous DIY Gypsy Wagon Cabin   Funky and Creative DIY Gypsy Wagon Cabin